Slide Topper Repair - Broken End Cap
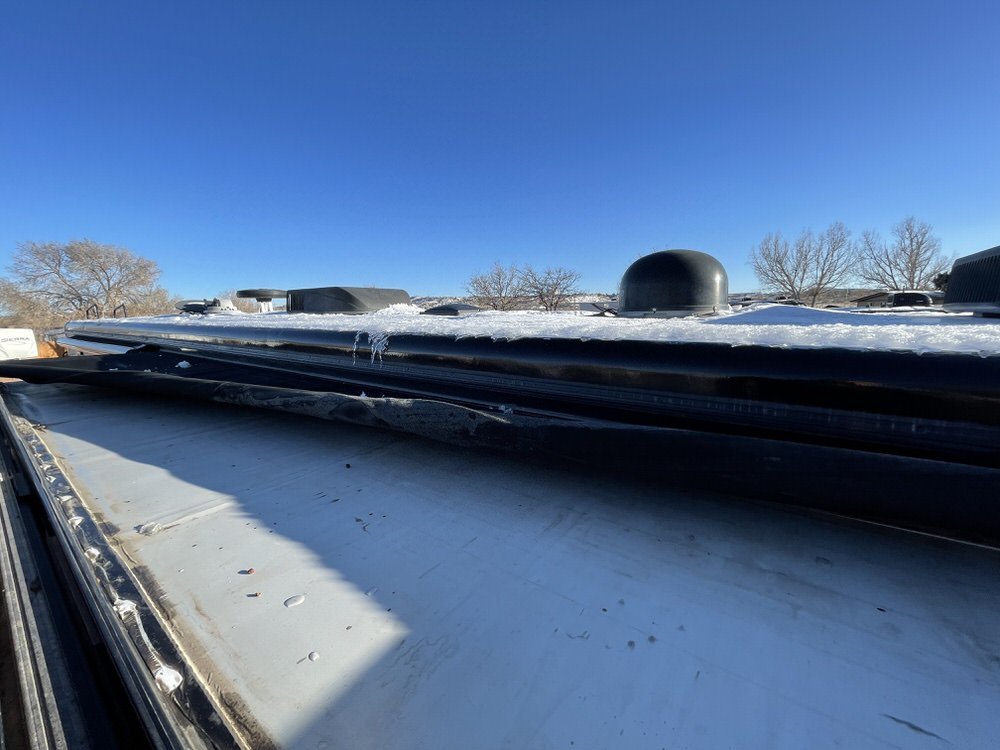
So if you heard in one of our previous articles, Petrified Forest National Park Take Two, we had just arrived in Gallup, New Mexico at our campsite for the night and we were putting our slides out when the passenger front slide struggled and then extended with a loud BANG! I was initially worried about a hydraulic failure, but the minute I went outside and looked at the slide (see the first picture below), I could tell something else had happened. It turns out the roller bar in the slide topper had seized up (the below-freezing temps and wind chill throughout the travel day probably contributed) and was preventing the slide from extending until the roller bar broke free on one side of the housing. Kinda impressive actually that it held up for several seconds with all that hydraulic force pushing on it, I apparently don’t give them credit for how strong they really are. We usually bring in the slides at 25+mph winds which now appears maybe too conservative unless the sound of them flapping is driving us nuts.

What Happened?
Anyway, I pulled out our telescoping ladder and took the second and third pictures below, then started trying to figure out what happened. Unfortunately, Gallup is so small it has zero mobile repair guys and not even any RV repair shops that I could try to get into the next morning so I was on my own to at least make it drivable. Since I had previously started collecting digital copies of all the manuals I could find for the entire motorhome and all serviceable parts, I also happened to have previously downloaded both the installation and service manuals for our toppers (Carefree SOK III). So I was referring to that when figuring out what was what and how to get the roller bar at least in a state where I could roll it back in the housing with the slide back in for travel. That’s when I noticed a loose small piece of metal that was out of place.
Broken End Cap
Turns out the broken piece came from the inside of the right hand (towards the front) end cap of the housing and is responsible for keeping the roller bar spring under tension, which in turn keeps the topper fabric tight whether the slide is extended or not. The spring must have seized and rather than unwinding as the slide extended, it became a tug of war between the spring and what I’m calling the “spring brake". The end cap is made out of a molded piece of aluminum and gave up first with the spring brake sheering off from the inside of the end cap housing. At the point of failure, I think of the pent up pressure from the hydraulics extending the slide, plus the spring tension unwinding provided enough energy to allow the right front end of the roller bar to break completely free and fly into the side of the motorhome (that was the BANG! I assume).
Manually Winding the Fabric
Things were looking up as I started to realize this was a small part to replace and everything else still looked intact. The replacement part number was in the service manual so I found one on Amazon for around $35 shipped and had it delivered to Durango where we were going to arrive in a few days to stay for a month of skiing. Next, I took the housing cover off (just a couple screws), and with me standing on the ladder, I hand-wound the roller and fabric up in the housing while Jeri slowly brought the slide in a few inches at a time. Eventually, we got it closed with everything stowed in the housing so I could put the cover back on. This took maybe an hour to figure out and complete so we were able to check out of the Gallup campground on time.
Repair
At Durango, we finished the repair which included removing the end cap (a few screws) and re-attaching the new one which was easy to do since the roller was already off. We also noticed the white stitching on the fabric ends was coming apart on most of the toppers including this one (bummer since the fabric was replaced new when we bought the motorhome in late 2018). Since we had to remove the fabric anyway, to re-tension the spring on the roller tube after it was reinstalled, Jeri busted out the sewing machine and re-stitched the fabric on both sides (use heavy-duty thread). Then we reinstalled the roller, tensioned the spring, re-attached the fabric, and put it back on the cover before testing it by bringing the slide in/out a couple of times.
All in all, it probably took us 4-5 hours but now that we know what we are doing it would probably take half the time to do it again. The service manual was invaluable to figuring out how the whole thing works. We didn’t really need any special tools for the job as I had all the ratchets and sockets needed. If we ever have to do any repairs or replace the fabric again, we could totally do it ourselves!